
❤️SpringBoot使用阿里云oss实现文件上传
一、对象存储OSS
1、开通“对象存储OSS”服务
(1)申请阿里云账号
(2)实名认证
(3)开通“对象存储OSS”服务
(4)进入管理控制台
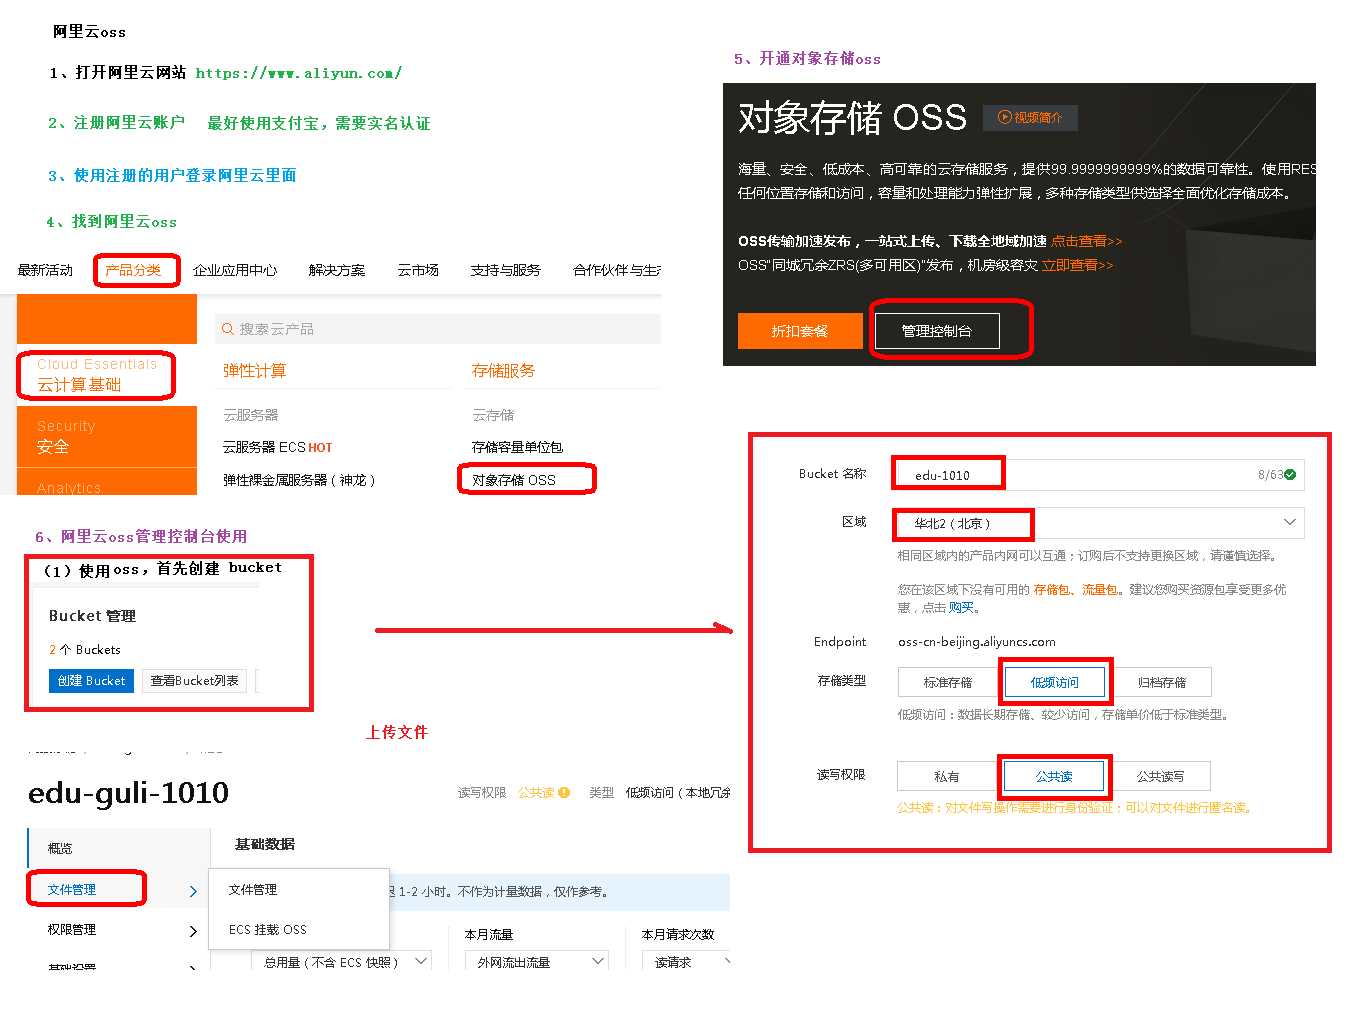
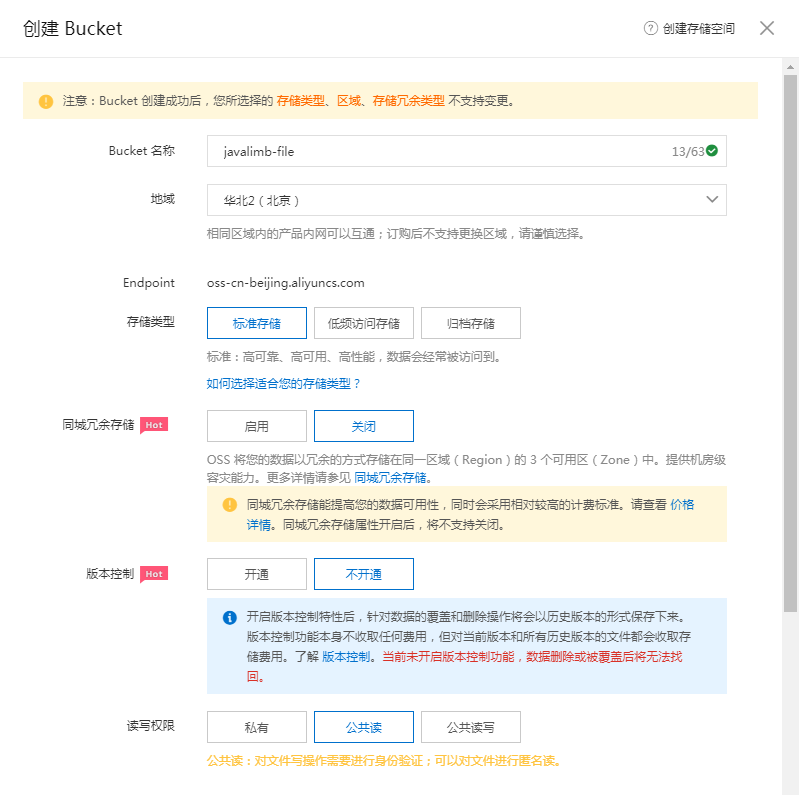
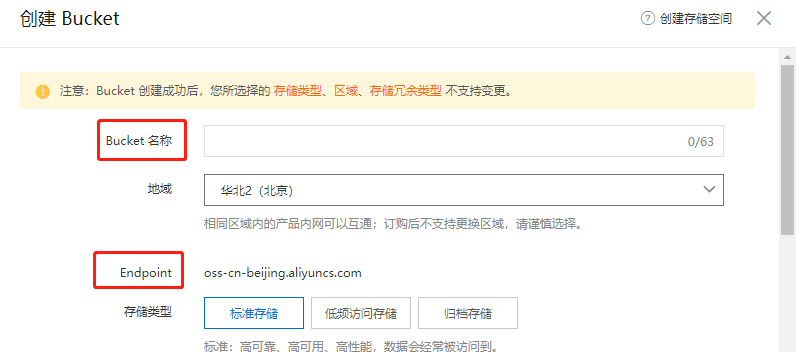
2、创建Bucket
Bucket名称:javalimb-file
地域:华北2(北京)
存储类型:标准存储
同城冗余存储:关闭
版本控制:不开通
读写权限:公共读
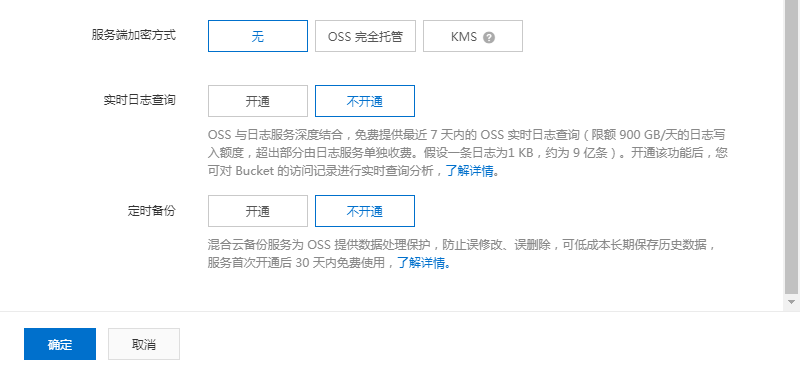
服务器加密方式:无
实时日志查询:不开通
定时备份:不开通
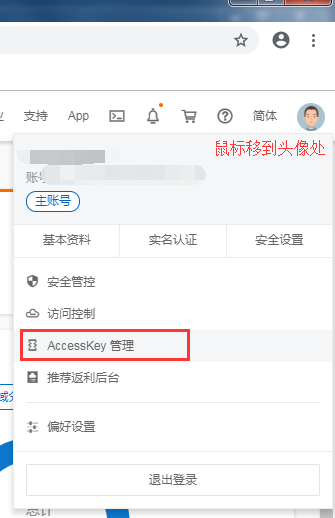
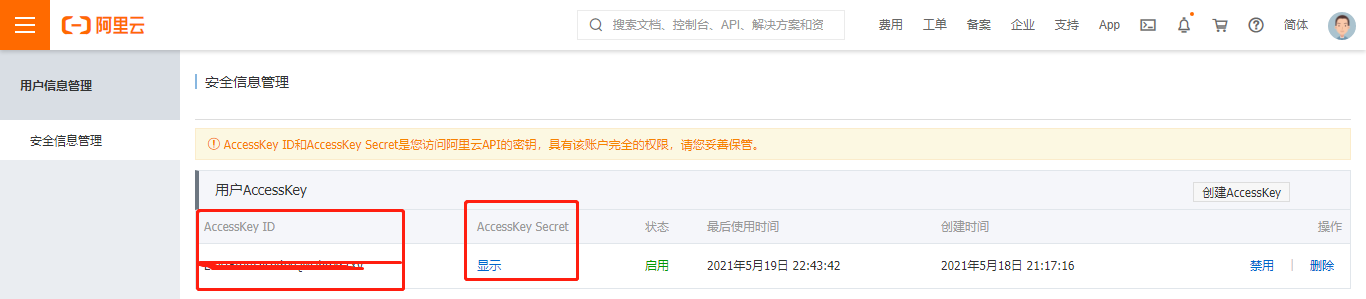
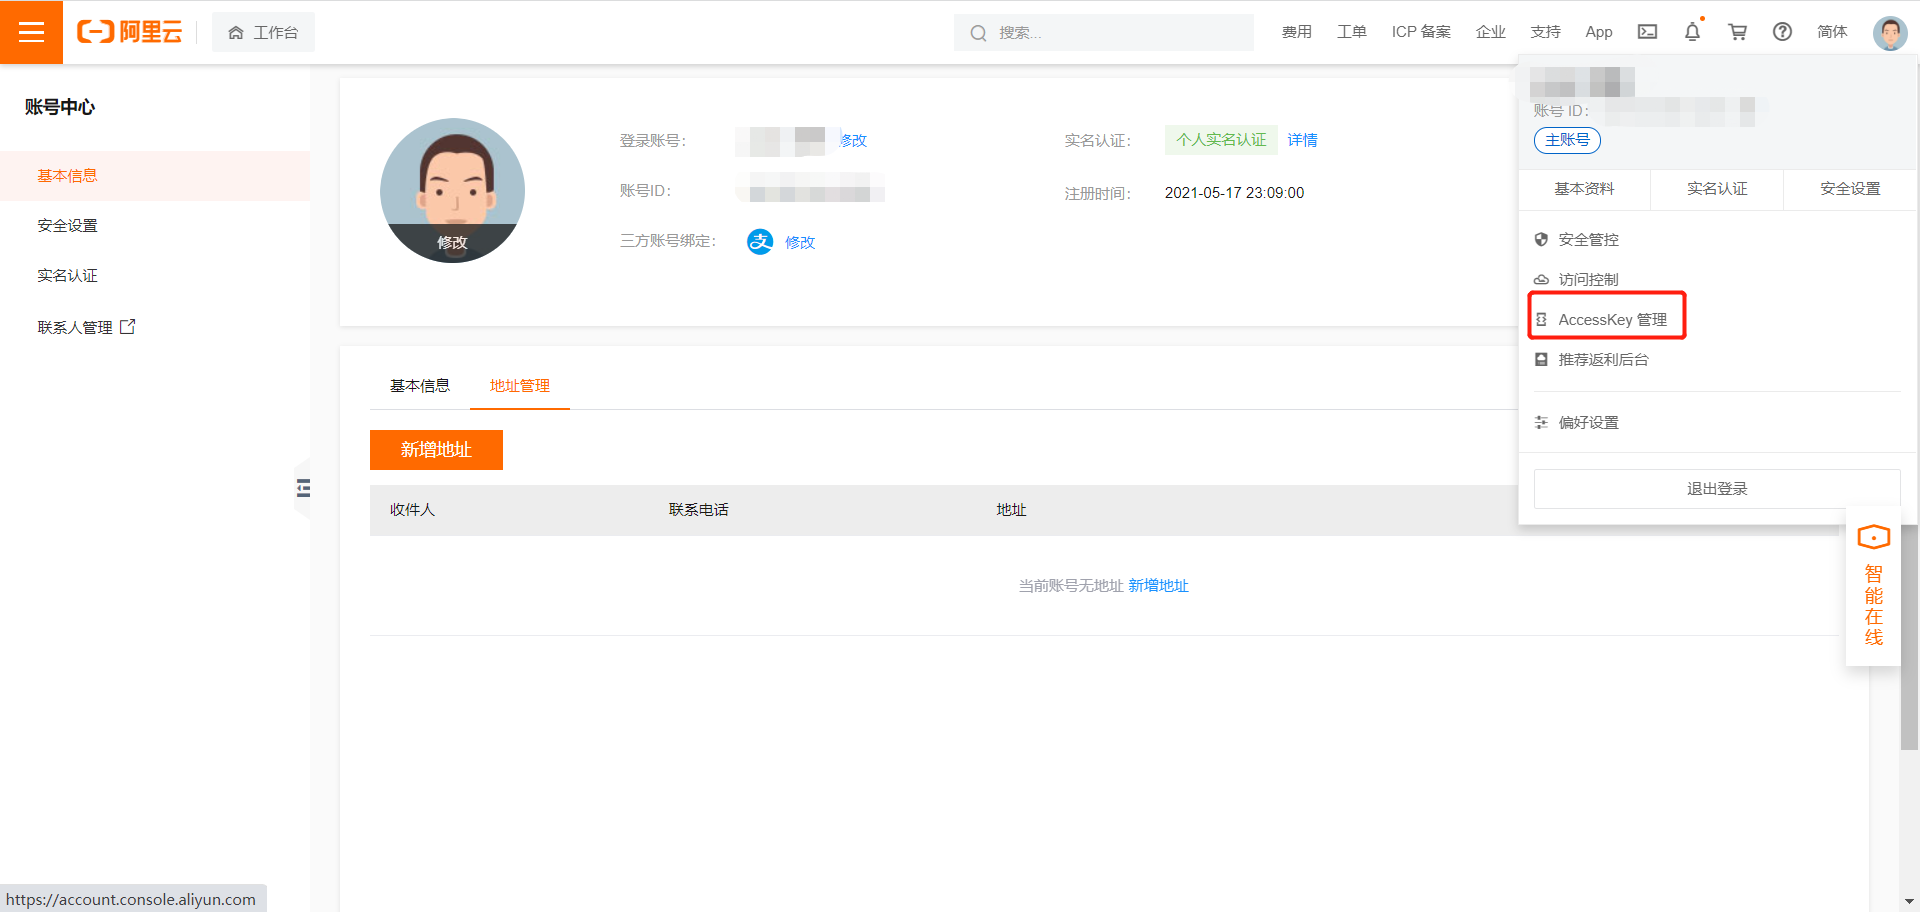
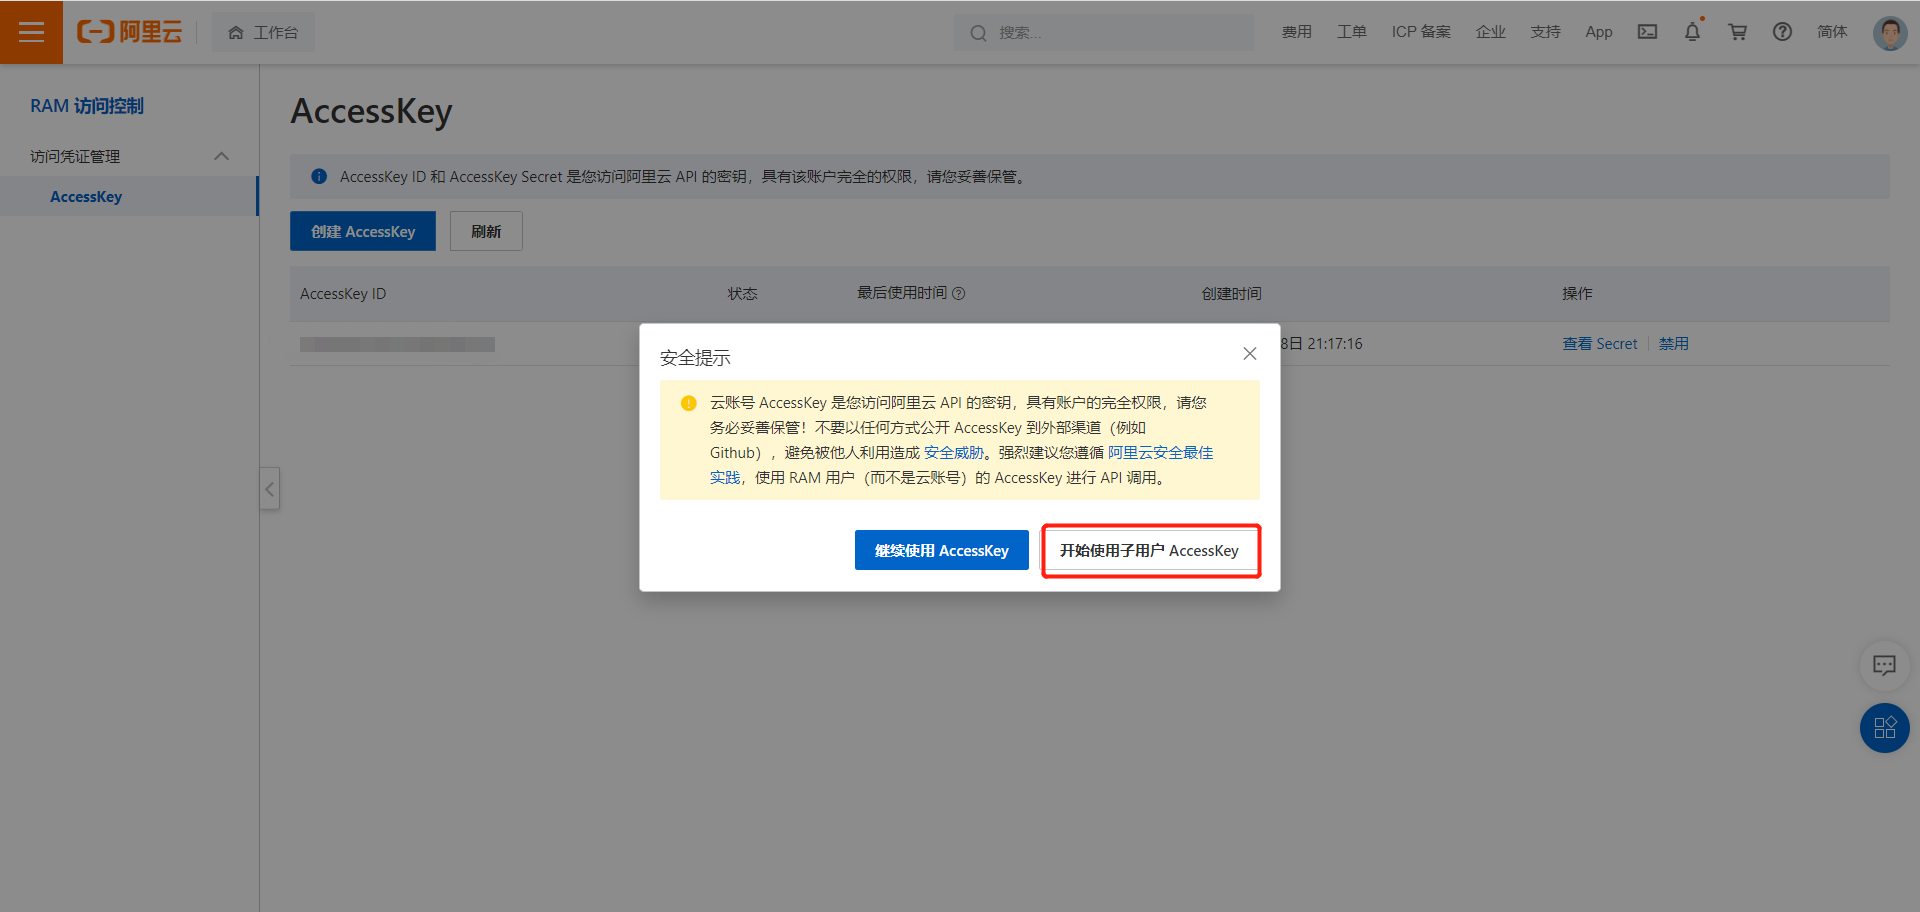
3、创建AccessKey
阿里云帮助文档地址
https://help.aliyun.com/?spm=a2c4g.11186623.6.538.6cb923458Rfc7f
阿里云对象存储OSS地址
https://help.aliyun.com/document_detail/31883.html?spm=a2c4g.11186623.6.595.385114a0f8JyvT
阿里云javaSDK文件上传地址
https://help.aliyun.com/document_detail/32013.html?spm=a2c4g.11186623.6.934.5ce314a0xWEkf2
文件上传参照地址
https://help.aliyun.com/document_detail/84781.html?spm=a2c4g.11186623.6.935.59df14a0eK7bAr
使用SDK需要先安装,具体可以参照阿里云官方文档。
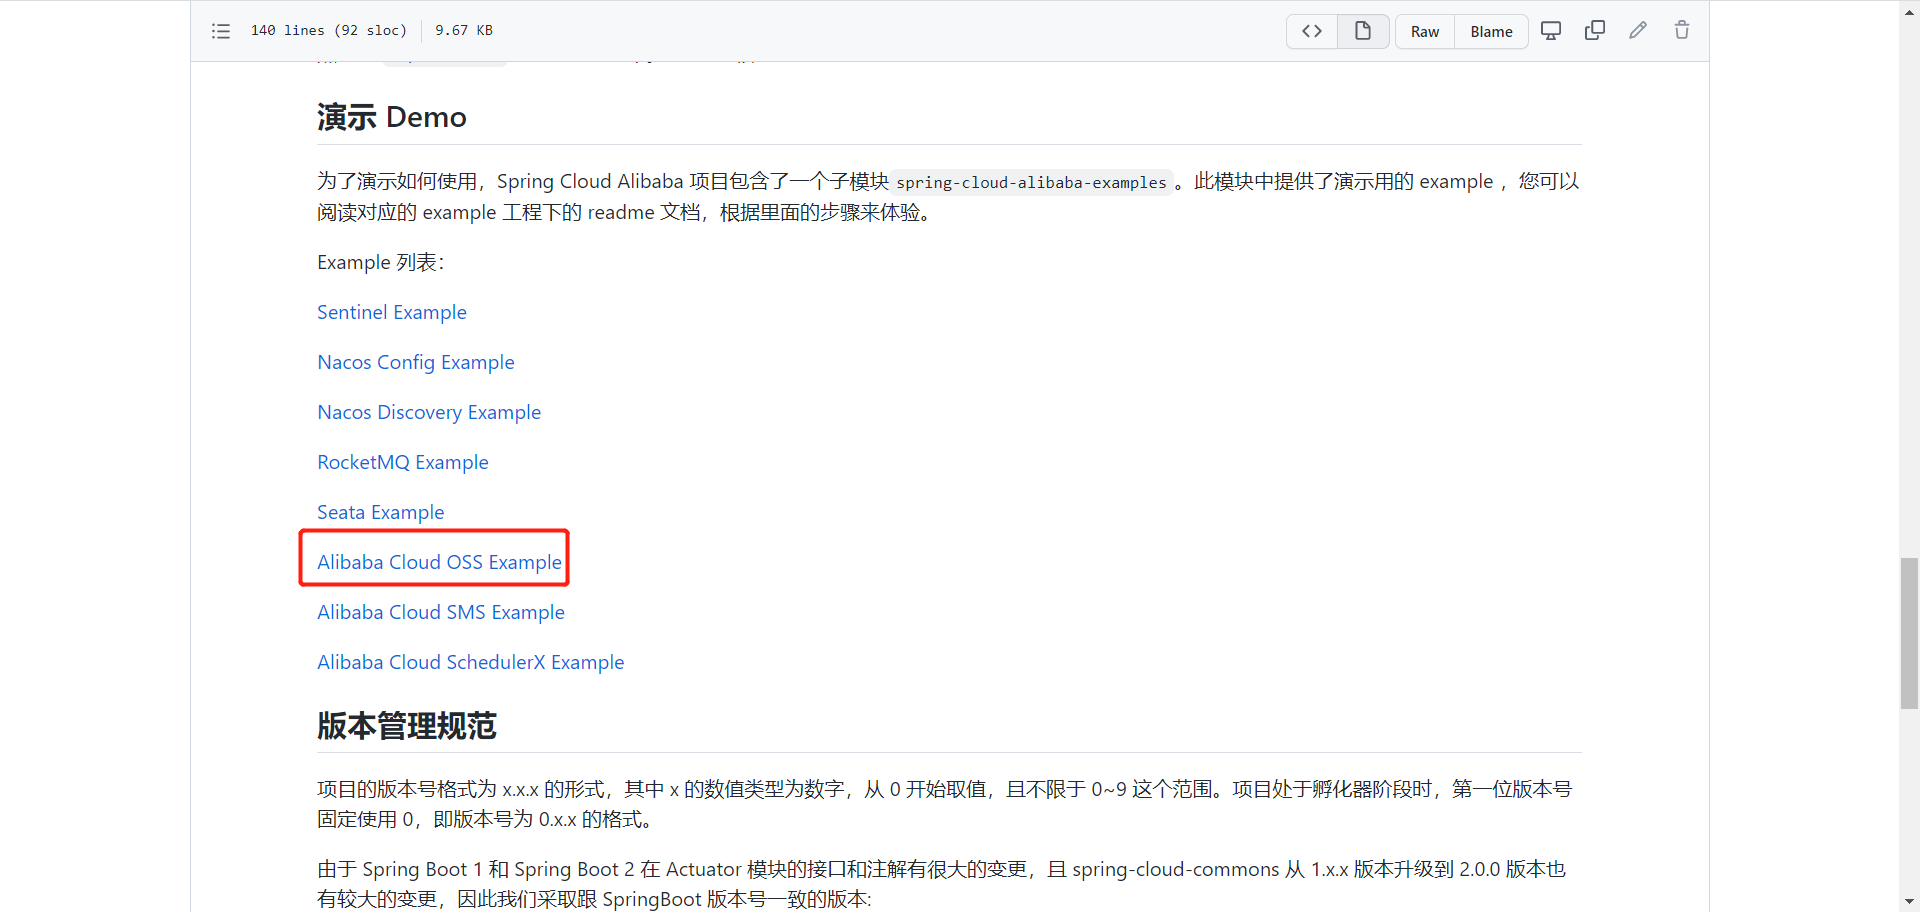
案例1(vue+springboot图片上传)
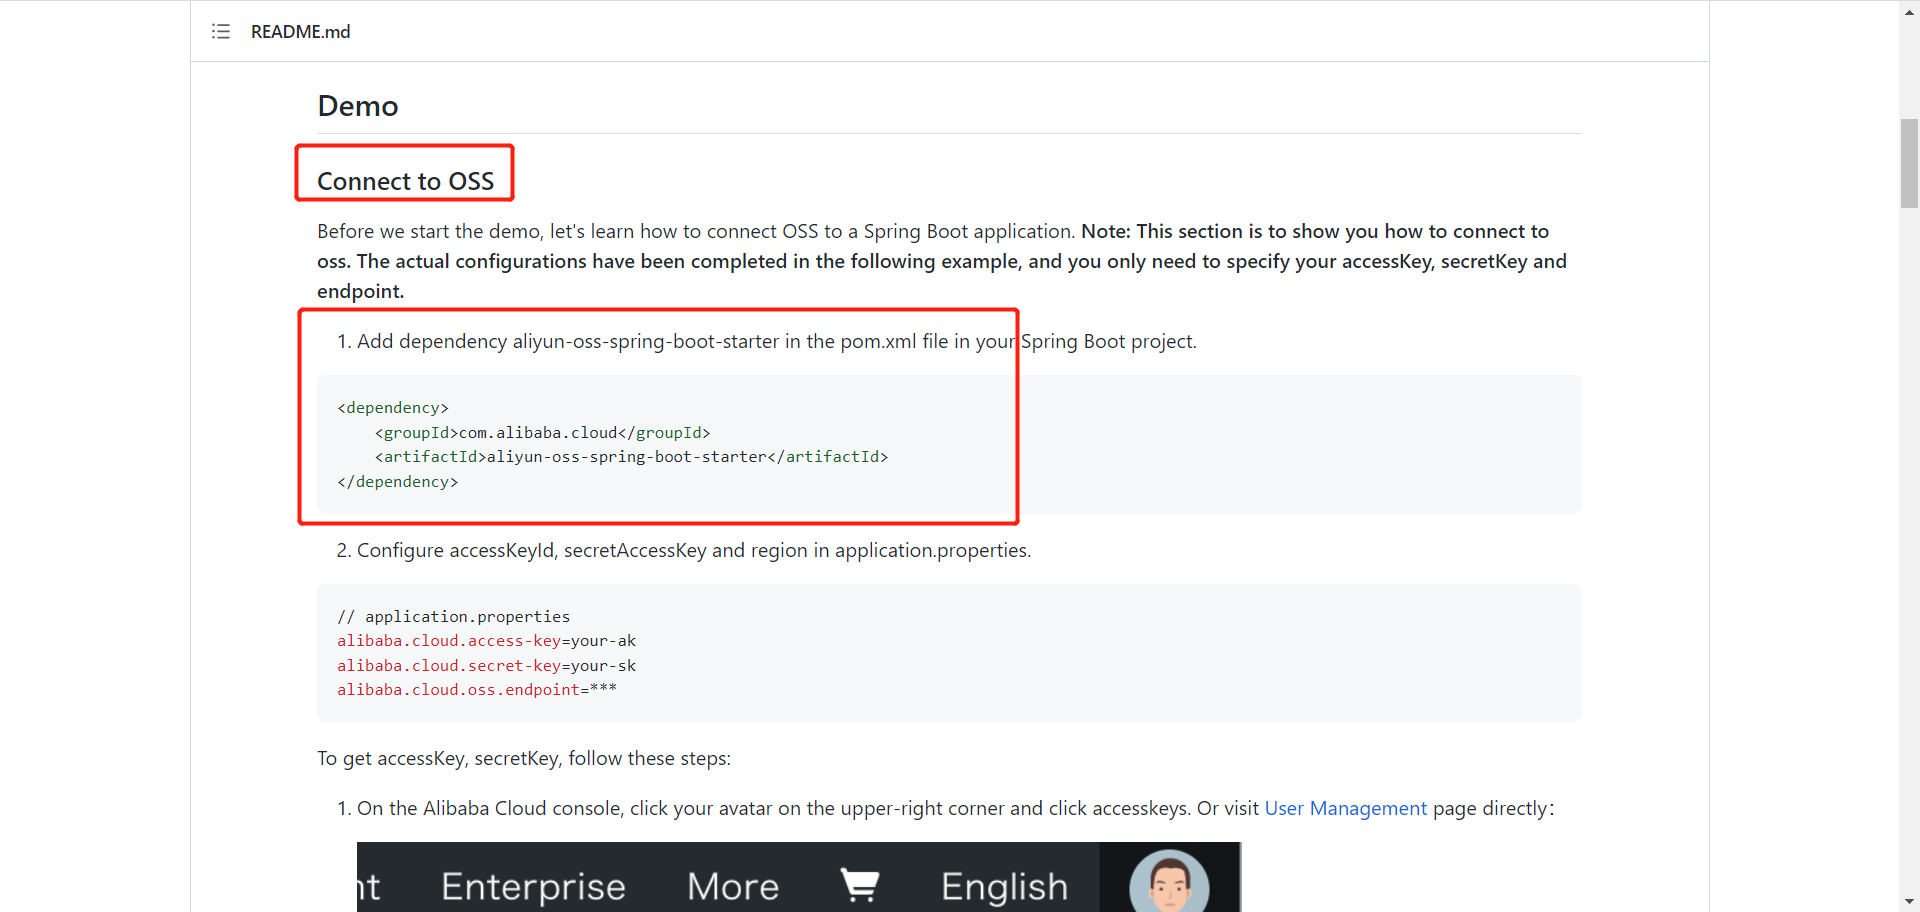
pom文件依赖
<dependencies>
        <!-- 阿里云oss依赖 -->
        <dependency>
            <groupId>com.aliyun.oss</groupId>
            <artifactId>aliyun-sdk-oss</artifactId>
        </dependency>

        <!-- 日期工具栏依赖 -->
        <dependency>
            <groupId>joda-time</groupId>
            <artifactId>joda-time</artifactId>
        </dependency>
    </dependencies>
yml文件
 1 server:
 2   port: 9120
 3
 4 spring:
 5   profiles:
 6     # 环境设置
 7     active: dev
 8
 9   application:
10     # 服务名
11     name: service_oss
12 aliyun:
13   oss:
14     endpoint: oss-cn-beijing.aliyuncs.com
15     keyId: xxxx
16     keySecret: Vxxxx
17     bucketname: exxxx
18 #阿里云 OSS
19 #不同的服务器,地址不同
20 #  aliyun.oss.file.endpoint=oss-cn-beijing.aliyuncs.com
21 #  aliyun.oss.file.keyid=xxxxxxxx
22 #  aliyun.oss.file.keysecret=dddddddddd
23 #
24 #  # nacos服务地址
25 #  spring.cloud.nacos.discovery.server-addr=127.0.0.1:8848
26 #
27 #  #bucket可以在控制台创建,也可以使用java代码创建
28 #  aliyun.oss.file.bucketname=edu8806
读取配置文件的类
 1 package com.stu.service.oss.utils;
 2
 3 import lombok.Data;
 4 import org.springframework.boot.context.properties.ConfigurationProperties;
 5 import org.springframework.stereotype.Component;
 6
 7 /******************************
 8  * 用途说明:从配置文件读取变量
 9  * 作者姓名: Administrator
10  * 创建时间: 2022-05-03 1:12
11  ******************************/
12 @Data
13 @Component
14 @ConfigurationProperties(prefix = "aliyun.oss")
15 public class OssProperties {
16
17     private String endpoint;
18     private String keyId;
19     private String keySecret;
20     private String bucketname;
21 }
读取配置文件的类(另一种写法,这里下边没有用到)
 1 package com.stu.oss.utils;
 2
 3 import org.springframework.beans.factory.InitializingBean;
 4 import org.springframework.beans.factory.annotation.Value;
 5 import org.springframework.stereotype.Component;
 6
 7 //项目启动,spring接口,spring加载之后,执行接口一个方法
 8 @Component
 9 public class ConstantPropertiesUtil implements InitializingBean {
10
11     //读取配置文件的内容
12
13     @Value("${aliyun.oss.file.endpoint}")
14     private String endpoint;
15     @Value("${aliyun.oss.file.keyid}")
16     private String keyid;
17     @Value("${aliyun.oss.file.keysecret}")
18     private String keysecret;
19     @Value("${aliyun.oss.file.bucketname}")
20     private String bucketname;
21
22     //定义一些静态常量
23     public  static String END_POINT;
24     public  static String KEY_ID;
25     public  static String KEY_SECRET;
26     public  static String BUCKET_NAME;
27
28     //上边赋值完成后,会执行afterPropertiesSet方法,这是spring机制
29     @Override
30     public void afterPropertiesSet() throws Exception {
31         END_POINT = endpoint;
32         KEY_ID = keyid;
33         KEY_SECRET = keysecret;
34         BUCKET_NAME = bucketname;
35
36
37     }
38 }
controller文件
 1 package com.stu.service.oss.controller;
 2
 3 import com.stu.service.base.result.R;
 4 import com.stu.service.oss.service.FileService;
 5 import lombok.extern.slf4j.Slf4j;
 6 import org.springframework.beans.factory.annotation.Autowired;
 7 import org.springframework.web.bind.annotation.PostMapping;
 8 import org.springframework.web.bind.annotation.RequestMapping;
 9 import org.springframework.web.bind.annotation.RestController;
10 import org.springframework.web.multipart.MultipartFile;
11
12 /******************************
13  * 用途说明:
14  * 作者姓名: Administrator
15  * 创建时间: 2022-05-03 2:22
16  ******************************/
17 @RestController
18 @RequestMapping("admin/oss/file")
19 @Slf4j
20 public class FIleController {
21
22     @Autowired
23     private FileService fileService;
24
25     @PostMapping("upload")
26     public R upload(MultipartFile file) {
27            String url = fileService.upload(file);
28             return R.ok().data("url", url);
29     }
30
31 }
service接口
 1 package com.stu.service.oss.service;
 2
 3 import org.springframework.web.multipart.MultipartFile;
 4
 5 public interface FileService {
 6
 7     /***********************************
 8      * 用途说明:文件上传
 9      * 返回值说明: java.lang.String
10      ***********************************/
11     String upload(MultipartFile file);
12 }
service实现类
endPoint,accessKeyId,accessKeySecret,bucketName的取值来源如下
  1 package com.stu.service.oss.service.impl;
  2
  3 import com.aliyun.oss.ClientException;
  4 import com.aliyun.oss.OSS;
  5 import com.aliyun.oss.OSSClientBuilder;
  6 import com.aliyun.oss.OSSException;
  7 import com.stu.service.oss.service.FileService;
  8 import com.stu.service.oss.utils.OssProperties;
  9 import org.joda.time.DateTime;
 10 import org.springframework.beans.factory.annotation.Autowired;
 11 import org.springframework.stereotype.Service;
 12 import org.springframework.web.multipart.MultipartFile;
 13
 14 import java.io.IOException;
 15 import java.io.InputStream;
 16 import java.util.UUID;
 17
 18 /******************************
 19  * 用途说明:文件上传
 20  * 作者姓名: Administrator
 21  * 创建时间: 2022-05-03 1:26
 22  ******************************/
 23 @Service
 24 public class FileServiceImpl implements FileService {
 25
 26     @Autowired
 27     private OssProperties ossProperties;
 28
 29     @Override
 30     public String upload(MultipartFile file) {
 31         // Endpoint以华东1(杭州)为例,其它Region请按实际情况填写。
 32         String endPoint = ossProperties.getEndpoint();
 33         // 阿里云账号AccessKey拥有所有API的访问权限,风险很高。强烈建议您创建并使用RAM用户进行API访问或日常运维,请登录RAM控制台创建RAM用户。
 34         String accessKeyId = ossProperties.getKeyId();
 35         String accessKeySecret = ossProperties.getKeySecret();
 36         // 填写Bucket名称,例如examplebucket。
 37         String bucketName = ossProperties.getBucketname();
 38         /*// 填写Object完整路径,完整路径中不能包含Bucket名称,例如exampledir/exampleobject.txt。
 39         //获取当前日期 joda-time
 40         String datePath = new DateTime().toString("yyyy/MM/dd");
 41         //1.文件名称添加一个唯一值
 42         String uuid = UUID.randomUUID().toString().replace("-", "");
 43         orginalFileName = uuid + orginalFileName;
 44         String fileExtention = orginalFileName.substring(orginalFileName.lastIndexOf("."));
 45         String objectName = module + "/" + datePath + orginalFileName + fileExtention;*/
 46
 47         // 创建OSSClient实例。
 48         OSS ossClient = new OSSClientBuilder().build(endPoint, accessKeyId, accessKeySecret);
 49         String url = null;
 50         // 填写本地文件的完整路径。如果未指定本地路径,则默认从示例程序所属项目对应本地路径中上传文件流。
 51         InputStream inputStream = null;
 52         try {
 53             //获取上传文件输入流
 54             inputStream = file.getInputStream();
 55             //调用oss方法实现上传
 56             //第一个参数 Bucket名称
 57             //第二个参数,上传到oss文件路径和文件名称   A/B/图片.jpg
 58             //第三个参数,上传文件输入流
 59             //获取文件名称
 60             // test.png
 61             String fileName = file.getOriginalFilename();
 62             //1.文件名称添加一个唯一值
 63             //80b8fbf76d5140f9b33917f883533cc3
 64             String uuid = UUID.randomUUID().toString().replace("-", "");
 65             fileName = uuid + fileName;
 66             //2.把文件安装日期进行分类
 67             //2021/05/20/图片.jpg
 68             //获取当前日期 joda-time
 69             String datePath = new DateTime().toString("yyyy/MM/dd");
 70
 71             //fileName 2022/05/03/80b8fbf76d5140f9b33917f883533cc3test.png
 72             fileName = datePath + "/" + fileName;
 73             ossClient.putObject(bucketName, fileName, inputStream);
 74             // 关闭OSSClient。
 75             ossClient.shutdown();
 76             //上传之后把文件路径返回
 77             //https://edu8806.oss-cn-beijing.aliyuncs.com/2022/05/03/80b8fbf76d5140f9b33917f883533cc3test.png
 78             url = "https://" + bucketName + "." + endPoint + "/" + fileName;
 79
 80         } catch (OSSException oe) {
 81             System.out.println("Caught an OSSException, which means your request made it to OSS, "
 82                     + "but was rejected with an error response for some reason.");
 83             System.out.println("Error Message:" + oe.getErrorMessage());
 84             System.out.println("Error Code:" + oe.getErrorCode());
 85             System.out.println("Request ID:" + oe.getRequestId());
 86             System.out.println("Host ID:" + oe.getHostId());
 87         } catch (ClientException ce) {
 88             System.out.println("Caught an ClientException, which means the client encountered "
 89                     + "a serious internal problem while trying to communicate with OSS, "
 90                     + "such as not being able to access the network.");
 91             System.out.println("Error Message:" + ce.getMessage());
 92         } catch (IOException e) {
 93             e.printStackTrace();
 94         } finally {
 95             if (ossClient != null) {
 96                 ossClient.shutdown();
 97             }
 98         }
 99         return url;
100     }
101
102 }
vue页面
<template>
  <div class="app-container">
    讲师添加
    <el-form label-width="120px">
      <el-form-item label="活动名称">
        <el-input v-model="teacher.name" />
      </el-form-item>
      <el-form-item label="入驻时间">
        <el-date-picker
          type="date"
          placeholder="选择日期"
          v-model="teacher.joinDate"
          value-format="yyyy-MM-dd"
        ></el-date-picker>
      </el-form-item>

      <el-form-item label="排序">
        <el-input v-model="teacher.sort" :min="0" />
      </el-form-item>
      <el-form-item label="讲师头衔">
        <el-select v-model="teacher.level" clearable placeholder="讲师头衔">
          <el-option :value="1" label="高级讲师" />
          <el-option :value="2" label="首席讲师" />
        </el-select>
      </el-form-item>

      <el-form-item label="讲师简介">
        <el-input v-model="teacher.intro" />
      </el-form-item>

      <el-form-item label="讲师资历">
        <el-input v-model="teacher.career" />
      </el-form-item>

      <el-form-item label="讲师头像">
        <el-upload
          :action="BASE_API + '/admin/oss/file/upload'"
          :show-file-list="false"
          :on-success="handleSuccess"
          :on-error="handleError"
          :before-upload="beforeUpload"
          class="avatar-uploader"
        >
          <img v-if="teacher.avatar" :src="teacher.avatar">
          <i v-else class="el-icon-plus avatar-uploader-icon" />
        </el-upload>
      </el-form-item>
      <el-form-item>
        <el-button
          type="primary"
          :disabled="saveBtnDisabled"
          @click="saveOrUpdate()"
          >{{ saveOrUpdateText }}</el-button
        >
      </el-form-item>
    </el-form>
  </div>
</template>

<script>
import teacherApi from "@/api/teacher";
export default {
  data() {
    return {
      saveBtnDisabled: false,
      saveOrUpdateText: "保存",
      BASE_API: process.env.BASE_API,
      //讲师对象
      teacher: {
        name: "",
        intro: "", //讲师简介
        career: "", //讲师资历
        level: 1, //头衔 1高级讲师 2首席讲师
        avatar: "", //讲师头像
        sort: 0,
        joinDate: "", //入驻时间
      },
    };
  },
  created() {
    //created之执行一次

    this.init();
  },
  watch: {
    //路由每次变化都执行
    $route(to, from) {
      debugger;
      console.log("to==== " + to);
      console.log("from=== " + from);

      this.init();
    },
  },
  methods: {
    handleSuccess(res) {
      if (res.success) {
        this.$message.success(res.message);
        this.teacher.avatar = res.data.url;
        this.$forceUpdate();
      } else {
        this.$message.error(res.message);
      }
    },
    handleError(res) {
      this.$message.error(res.message);
    },
    beforeUpload(file) {
      let isJpg = file.type === "image/jpeg";
      if (!isJpg) {
        this.$message.error("上传头像图片只能是JPG格式!");
        return false;
      }
      let isLt2M = file.size / 1024 / 1024 < 2;
      if (!isLt2M) {
        this.$message.error("上传头像图片不能超过2MB!");
        return false;
      }
      return true;
    },
    init() {
      //修改就把详情查出来,否则页面是新增页面,新增页面对象数据是空
      if (this.$route.params && this.$route.params.id) {
        this.getDetail(this.$route.params.id);
        this.saveOrUpdateText = "修改";
      } else {
        this.teacher = {};
        this.saveOrUpdateText = "保存";
      }
    },
    //同一个页面,判断是新增还是修改
    saveOrUpdate() {
      if (this.teacher.id) {
        //更新
        this.update();
      } else {
        //新增
        this.save();
      }
    },
    //进入到修改页面,需要回显的数据
    getDetail(id) {
      teacherApi.getDetail(id).then((res) => {
        if (res.code === 20000 && res.data.dataInfo) {
          this.teacher = res.data.dataInfo;
          this.$message({
            type: "info",
            message: "数据初始化成功",
          });
        } else {
          this.$message({
            type: "info",
            message: "数据初始化失败",
          });
        }
      });
    },
    //新增
    save() {
      teacherApi.save(this.teacher).then((res) => {
        if (res.code === 20000 && res.data) {
          this.$message({
            type: "info",
            message: "添加成功",
          });
          this.$router.push({ path: "/teacher/list" });
        } else {
          this.$message({
            type: "info",
            message: "添加失败",
          });
        }
      });
    },
    //修改
    update() {
      teacherApi.update(this.teacher).then((res) => {
        if (res.code === 20000 && res.data) {
          this.$message({
            type: "info",
            message: "修改成功",
          });
          this.$router.push({ path: "/teacher/list" });
        } else {
          this.$message({
            type: "info",
            message: "修改失败",
          });
        }
      });
    },
  },
};
</script>

<style scoped>
.avatar-uploader .el-upload {
  border: 1px dashed #d9d9d9;
  border-radius: 6px;
  cursor: pointer;
  position: relative;
  overflow: hidden;
}

.avatar-uploader .el-upload:hover {
  border-color: #409EFF;
}

.avatar-uploader .avatar-uploader-icon {
  font-size: 28px;
  color: #8c939d;
  width: 178px;
  height: 178px;
  line-height: 178px;
  text-align: center;
}

.avatar-uploader img {
  width: 178px;
  height: 178px;
  display: block;
}
</style>
案例2
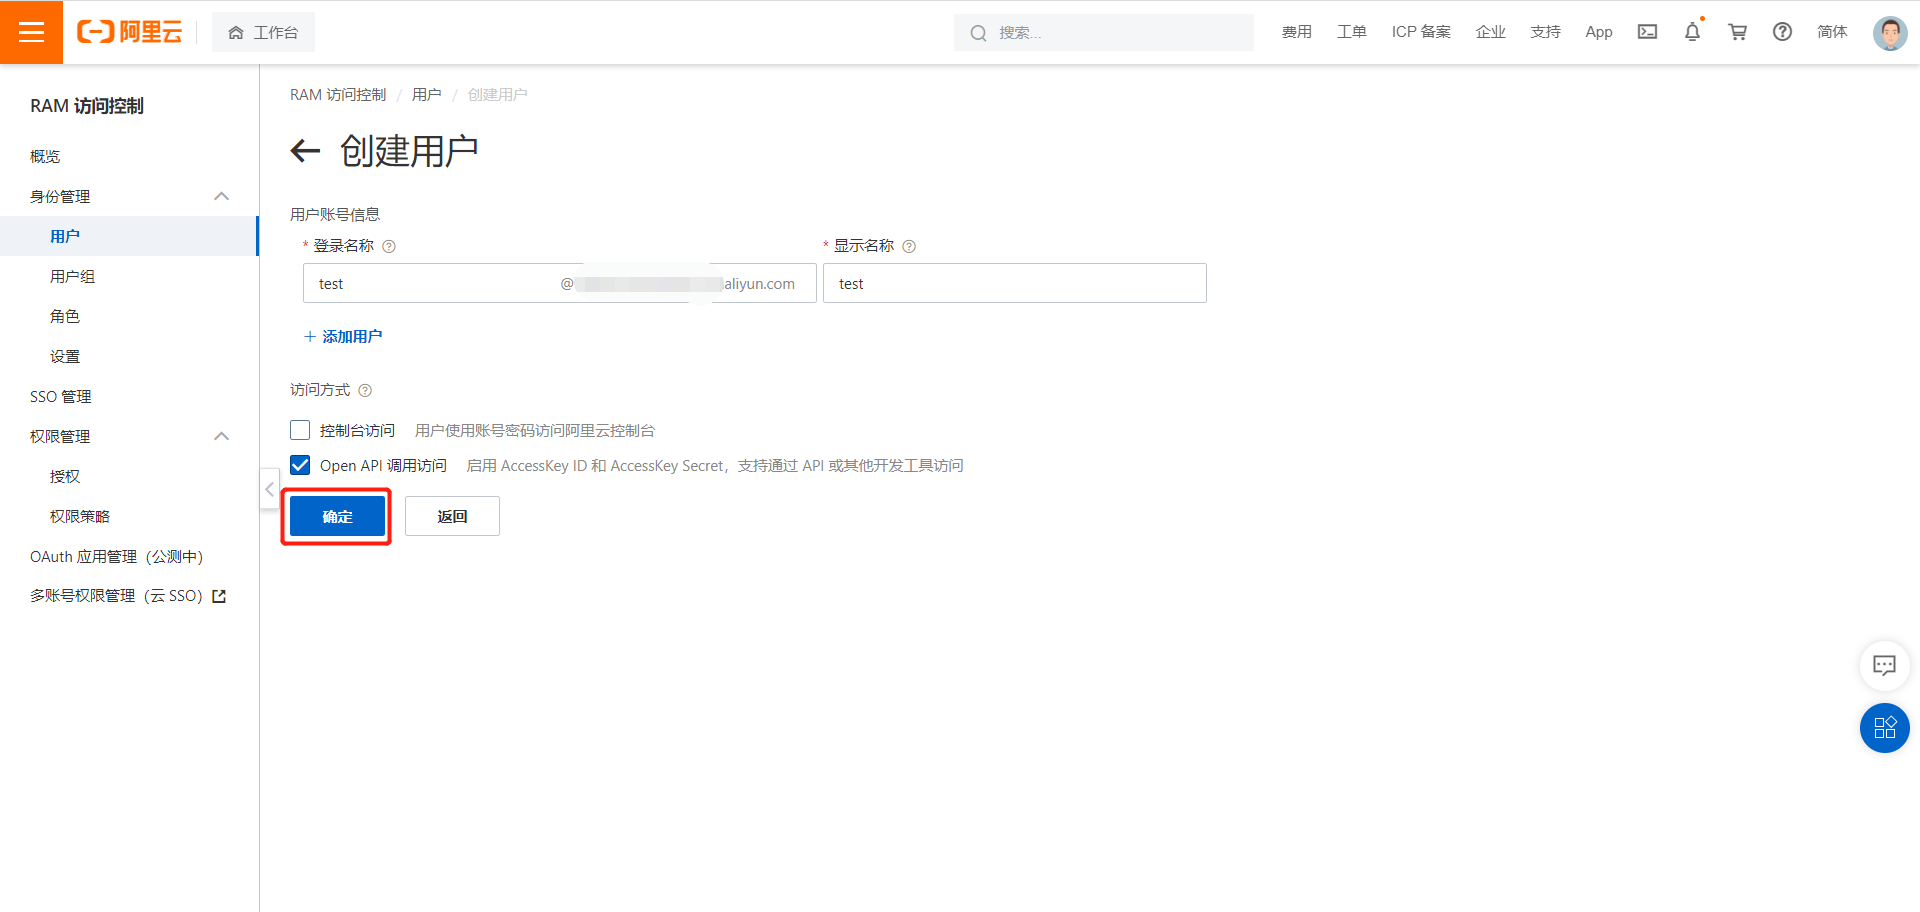
1、阿里云开通用户和权限
通过子用户
子账号
创建
创建AccessKey
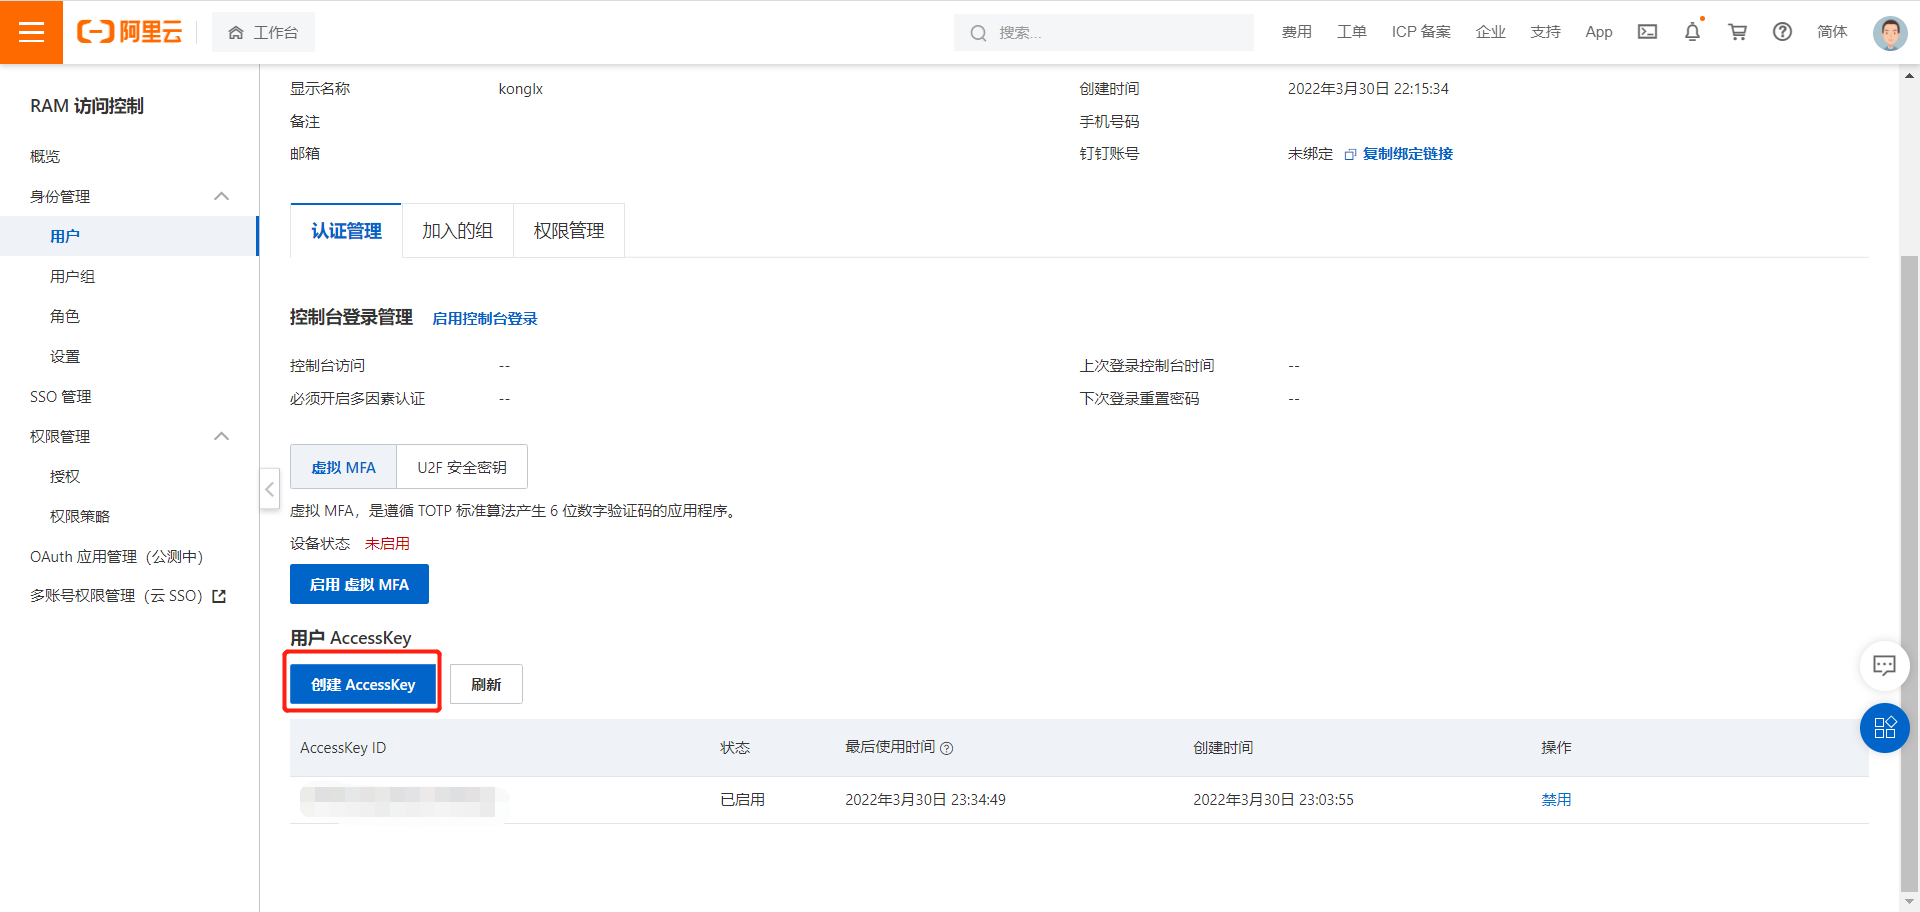
点击创建AccessKey,注意目前这个只能看一次,要么复制用户和密码然后自己保存,要么下载csv文件保存。
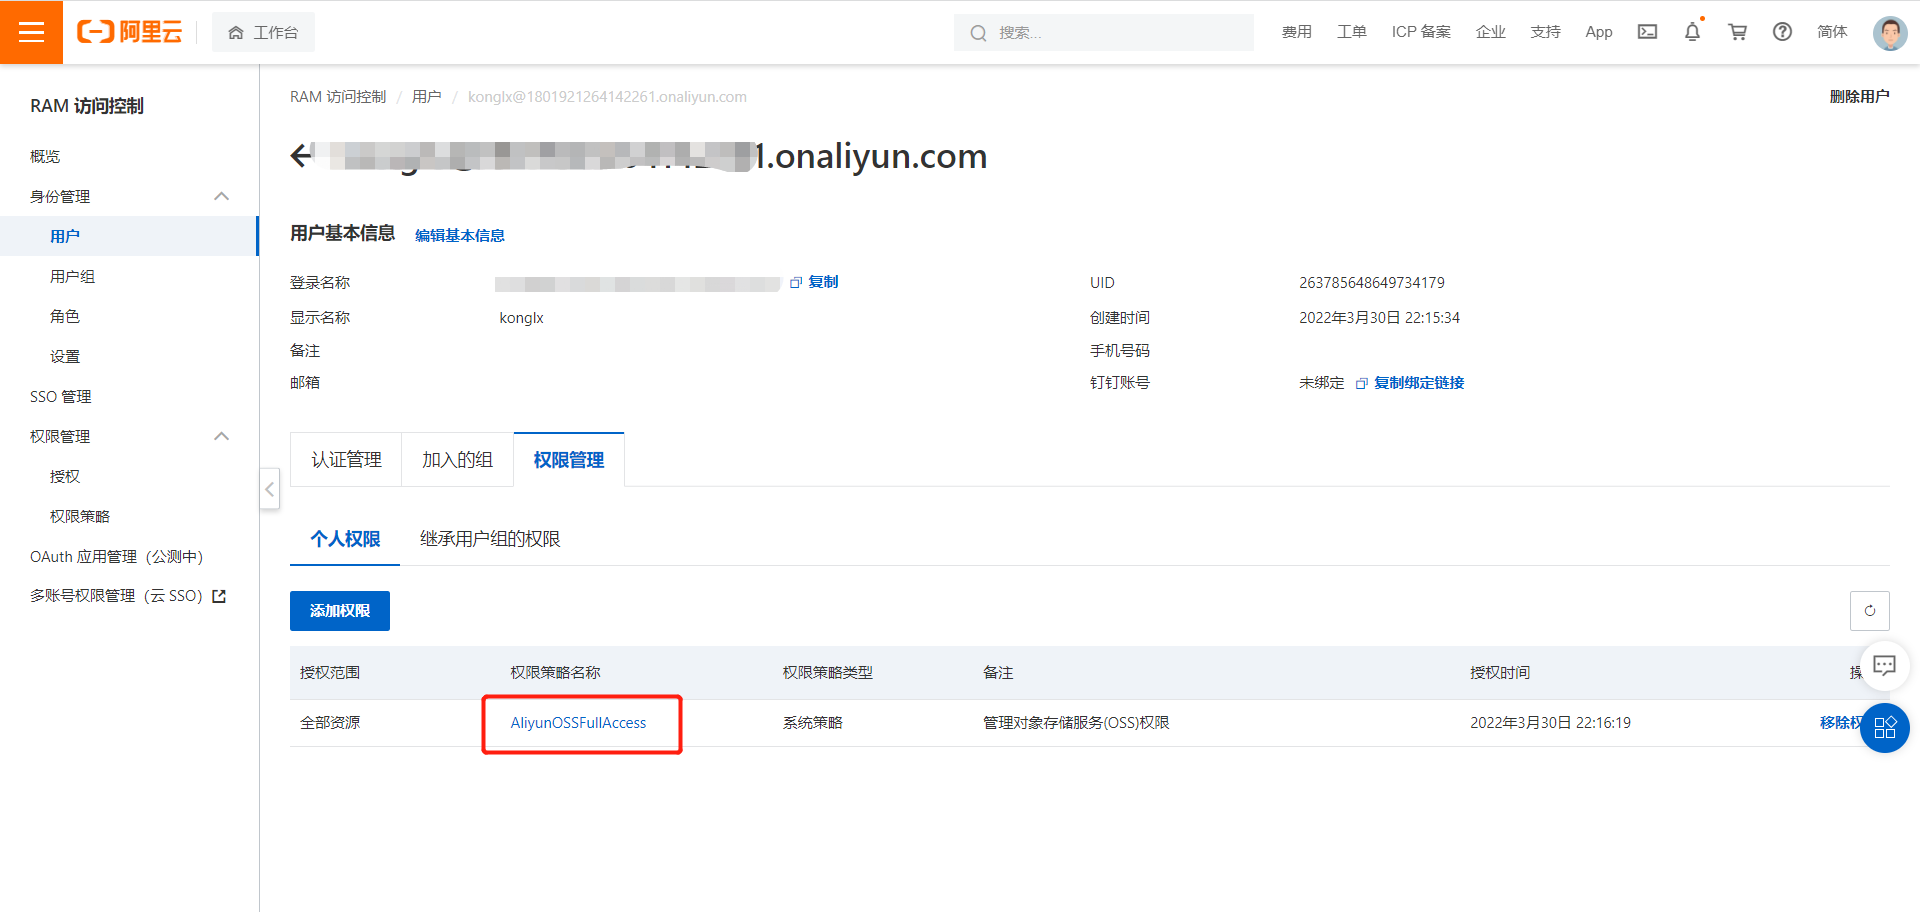
然后给这个子用户添加权限
2、通过SDK简单上传-上传文件流
参考文档:https://help.aliyun.com/document_detail/32009.html
2.1、添加pom依赖
<dependency>
    <groupId>com.aliyun.oss</groupId>
    <artifactId>aliyun-sdk-oss</artifactId>
    <version>3.10.2</version>
</dependency>
2.2、代码
package com.stu.gulimall.product;

import com.stu.gulimall.product.entity.BrandEntity;
import com.stu.gulimall.product.service.BrandService;
import org.junit.jupiter.api.Test;
import org.springframework.beans.factory.annotation.Autowired;
import org.springframework.boot.SpringBootVersion;
import org.springframework.boot.test.context.SpringBootTest;
import org.springframework.core.SpringVersion;
import com.aliyun.oss.ClientException;
import com.aliyun.oss.OSS;
import com.aliyun.oss.OSSClientBuilder;
import com.aliyun.oss.OSSException;
import com.aliyun.oss.model.PutObjectRequest;
import java.io.ByteArrayInputStream;
import java.io.FileInputStream;
import java.io.FileNotFoundException;
import java.io.InputStream;

@SpringBootTest
class GulimallProductApplicationTests {

    @Autowired
    BrandService brandService;

    @Test
    void contextLoads() {
        BrandEntity b = new BrandEntity();
    b.setName("test");
        brandService.save(b);
        System.out.println("=================================");
    }
    @Test
    public void getSpringVersion() throws FileNotFoundException {
// Endpoint以华东1(杭州)为例,其它Region请按实际情况填写。
        String endpoint = "oss-cn-beijing.aliyuncs.com";
        // 阿里云账号AccessKey拥有所有API的访问权限,风险很高。强烈建议您创建并使用RAM用户进行API访问或日常运维,请登录RAM控制台创建RAM用户。
        String accessKeyId = "xxxxxxxxxxxx";
        String accessKeySecret = "xxxxxxxxxxxxxxxxxxxx";
        // 填写Bucket名称,例如examplebucket。
        String bucketName = "edu8806";

        // 填写Object完整路径,完整路径中不能包含Bucket名称,例如exampledir/exampleobject.txt。
        String objectName = "test.png";
        // 填写本地文件的完整路径,例如D:\\localpath\\examplefile.txt。
        // 如果未指定本地路径,则默认从示例程序所属项目对应本地路径中上传文件流。
        String filePath= "E:\\test.png";

        // 创建OSSClient实例。
        OSS ossClient = new OSSClientBuilder().build(endpoint, accessKeyId, accessKeySecret);

        try {
            InputStream inputStream = new FileInputStream(filePath);
            // 创建PutObject请求。
            ossClient.putObject(bucketName, objectName, inputStream);
        } catch (OSSException oe) {
            System.out.println("Caught an OSSException, which means your request made it to OSS, "
                    + "but was rejected with an error response for some reason.");
            System.out.println("Error Message:" + oe.getErrorMessage());
            System.out.println("Error Code:" + oe.getErrorCode());
            System.out.println("Request ID:" + oe.getRequestId());
            System.out.println("Host ID:" + oe.getHostId());
        } catch (ClientException ce) {
            System.out.println("Caught an ClientException, which means the client encountered "
                    + "a serious internal problem while trying to communicate with OSS, "
                    + "such as not being able to access the network.");
            System.out.println("Error Message:" + ce.getMessage());
        } finally {
            if (ossClient != null) {
                ossClient.shutdown();
                System.out.println("============success===============");
            }
        }
    }
}
3、通过封装好的代码
参考地址:https://github.com/alibaba/spring-cloud-alibaba(这个目前可能存在版本兼容问题,可以参考下边的文章解决)
上传文件如果提示这个问题【解决Cannot resolve com.alibaba.cloud:aliyun-oss-spring-boot-starter:unknown 文件上传报错aliCloudEdasSdk解决】 可以参考这篇文章https://www.cnblogs.com/konglxblog/p/16100349.html
接入oss
修改pom文件,引入aliyun-oss-spring-boot-starter(注意上边的是通过SDK,这里是通过starter)
        <!--引入阿里云封装好的cloud oss-->
        <dependency>
            <groupId>com.alibaba.cloud</groupId>
            <artifactId>spring-cloud-starter-alicloud-oss</artifactId>
            <version>2.1.0.RELEASE</version>
        </dependency>
yml文件(注意这里的key和endpoint是阿里云的子用户)
#配置数据源
spring:
  datasource:
    username: root
    password: root
    url: jdbc:mysql://123.57xxx:3306/gulimall_pms?useUnicode=true&characterEncoding=UTF-8&serverTimezone=Asia/Shanghai
    driver-class-name: com.mysql.jdbc.Driver
  cloud:
    nacos:
      discovery:
        server-addr: xxx:8848
    alicloud:
      access-key: xxx
      secret-key: xxx
      oss:
        endpoint: xxx
测试代码
package com.stu.gulimall.product;

import com.aliyun.oss.ClientException;
import com.aliyun.oss.OSSClient;
import com.aliyun.oss.OSSException;
import com.stu.gulimall.product.entity.BrandEntity;
import com.stu.gulimall.product.service.BrandService;
import org.junit.jupiter.api.Test;
import org.junit.runner.RunWith;
import org.springframework.beans.factory.annotation.Autowired;
import org.springframework.boot.test.context.SpringBootTest;
import org.springframework.test.context.junit4.SpringRunner;

import java.io.FileInputStream;
import java.io.FileNotFoundException;
import java.io.InputStream;

@RunWith(SpringRunner.class)
@SpringBootTest
class GulimallProductApplicationTests {

    @Autowired
    BrandService brandService;
    @Autowired
    private OSSClient ossClient;
    @Test
    void contextLoads() {
        BrandEntity b = new BrandEntity();
        b.setName("test");
        brandService.save(b);
        System.out.println("=================================");
    }
    @Test
    public void getSpringVersion() throws FileNotFoundException {
// Endpoint以华东1(杭州)为例,其它Region请按实际情况填写。
       /* String endpoint = "oss-cn-beijing.aliyuncs.com";
        // 阿里云账号AccessKey拥有所有API的访问权限,风险很高。强烈建议您创建并使用RAM用户进行API访问或日常运维,请登录RAM控制台创建RAM用户。
        String accessKeyId = "xxxxxxxxxxxx";
        String accessKeySecret = "xxxxxxxxxxxxxxxxxxxx";
        // 填写Bucket名称,例如examplebucket。
        String bucketName = "edu8806";

        // 填写Object完整路径,完整路径中不能包含Bucket名称,例如exampledir/exampleobject.txt。
        String objectName = "test.png";
        // 填写本地文件的完整路径,例如D:\\localpath\\examplefile.txt。
        // 如果未指定本地路径,则默认从示例程序所属项目对应本地路径中上传文件流。
        String filePath= "E:\\test.png";

        // 创建OSSClient实例。
        OSS ossClient = new OSSClientBuilder().build(endpoint, accessKeyId, accessKeySecret);*/
        // 填写Bucket名称,例如examplebucket。
        String bucketName = "edu8806";

        // 填写Object完整路径,完整路径中不能包含Bucket名称,例如exampledir/exampleobject.txt。
        String objectName = "test.png";
        // 填写本地文件的完整路径,例如D:\\localpath\\examplefile.txt。
        // 如果未指定本地路径,则默认从示例程序所属项目对应本地路径中上传文件流。
        String filePath= "E:\\test.png";
        try {
            InputStream inputStream = new FileInputStream(filePath);
            // 创建PutObject请求。
            ossClient.putObject(bucketName, objectName, inputStream);
        } catch (OSSException oe) {
            System.out.println("Caught an OSSException, which means your request made it to OSS, "
                    + "but was rejected with an error response for some reason.");
            System.out.println("Error Message:" + oe.getErrorMessage());
            System.out.println("Error Code:" + oe.getErrorCode());
            System.out.println("Request ID:" + oe.getRequestId());
            System.out.println("Host ID:" + oe.getHostId());
        } catch (ClientException ce) {
            System.out.println("Caught an ClientException, which means the client encountered "
                    + "a serious internal problem while trying to communicate with OSS, "
                    + "such as not being able to access the network.");
            System.out.println("Error Message:" + ce.getMessage());
        } finally {
            if (ossClient != null) {
                ossClient.shutdown();
                System.out.println("============success===============");
            }
        }
    }
}